How to Create Accessible Web Content
Writing
You might not have enough resources to make every webpage on your website accessible. You should prioritise fixes to your most visited pages and webpages that are particularly relevant to users with disabilities, and make them accessible. One of the easiest ways to make your website more accessible is to improve how the text is written.
Write for everyone
Help users understand the message and purpose of the page by using:
- easy to understand words,
- short sentences,
- short blocks of text,
- put important information first
- provide summaries for long documents or other media
You can find more detailed information about writing for the web at the links below.
GOV.UK Writing Content for the Web

Cognitive Accessibility Objective: Use Clear and Understandable Content
New Graphic Content Guide
Make link text meaningful
When users come across a link on a web page, they expect to understand the purpose of the link. Links should be meaningful and descriptive so users know right away where links will take them without having to activate them. The purpose of each link should be able to be determined from the link text alone.
Screen reader users often listen to links out of context, either by navigating through the links, or by using a keyboard command to list all of the links on the page. The best technique is to make sure all links make sense out of context.
Avoid using ambiguous link text, such as ‘click here’ or ‘read more’. If you use descriptive labels instead of standalone Find out more text, your copy will benefit in several ways:
- Links will be more accessible.
- Links will be more enticing to users and potentially more persuasive.
- Users will feel more confident as they click from page to page.
- More keywords on the page will help search engine optimisation.
- Meaningful links will stand alone and help users who are scanning the page.
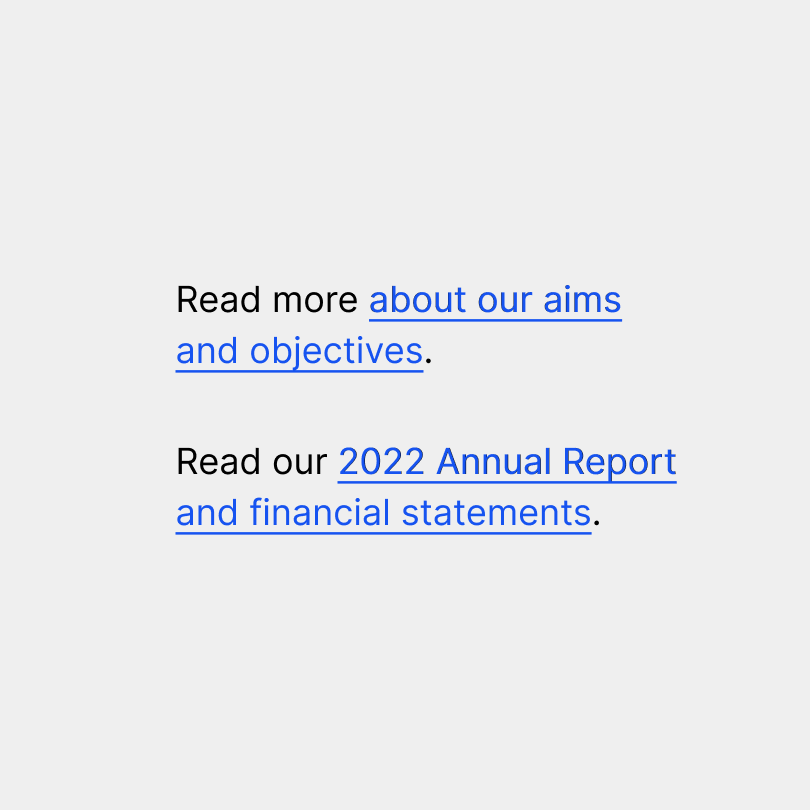
The link text is good because its meaning makes sense independent of its surrounding text.
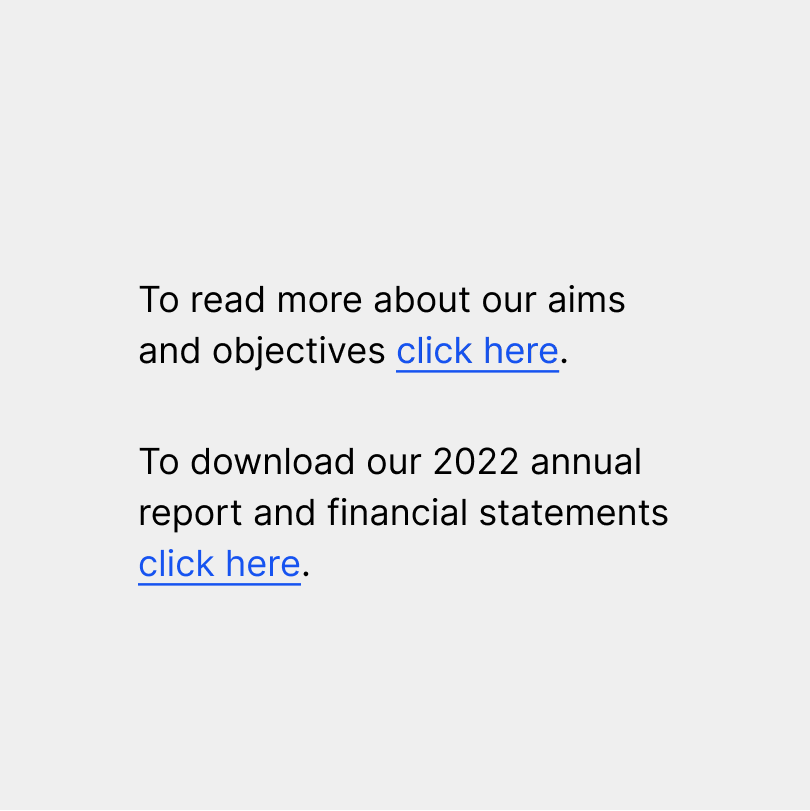
In these examples, the text of each link doesn’t indicate their purpose. The links also have identical text, despite linking to different locations.
Use headings to convey meaning and structure
Use short headings to group related paragraphs and clearly describe sections. Good headings provide an outline of the content.
For pages longer than three or four paragraphs, headings and subheadings are important for usability and accessibility. They help readers to determine the overall outline of a page and navigate to specific information of interest.
Headings are classified into levels from one to six. The highest level is ‘Level 1’ and often corresponds to the title of the page or major document section.
Users with normal vision identify headers by scanning pages for text of a larger size or a different style. Assistive technology users are not able to see these visual changes, so changing the style is not a sufficient cue.
Instead, the headings must be semantically “tagged” so that screen reader users can identify headings. It is important to tag the content in WordPress as a heading instead of just bolding the heading text. Otherwise they will not be identifiable to screen reader users.
Using heading tags also helps search engines understand the structure and content of the page, which can lead to better rankings in search results.
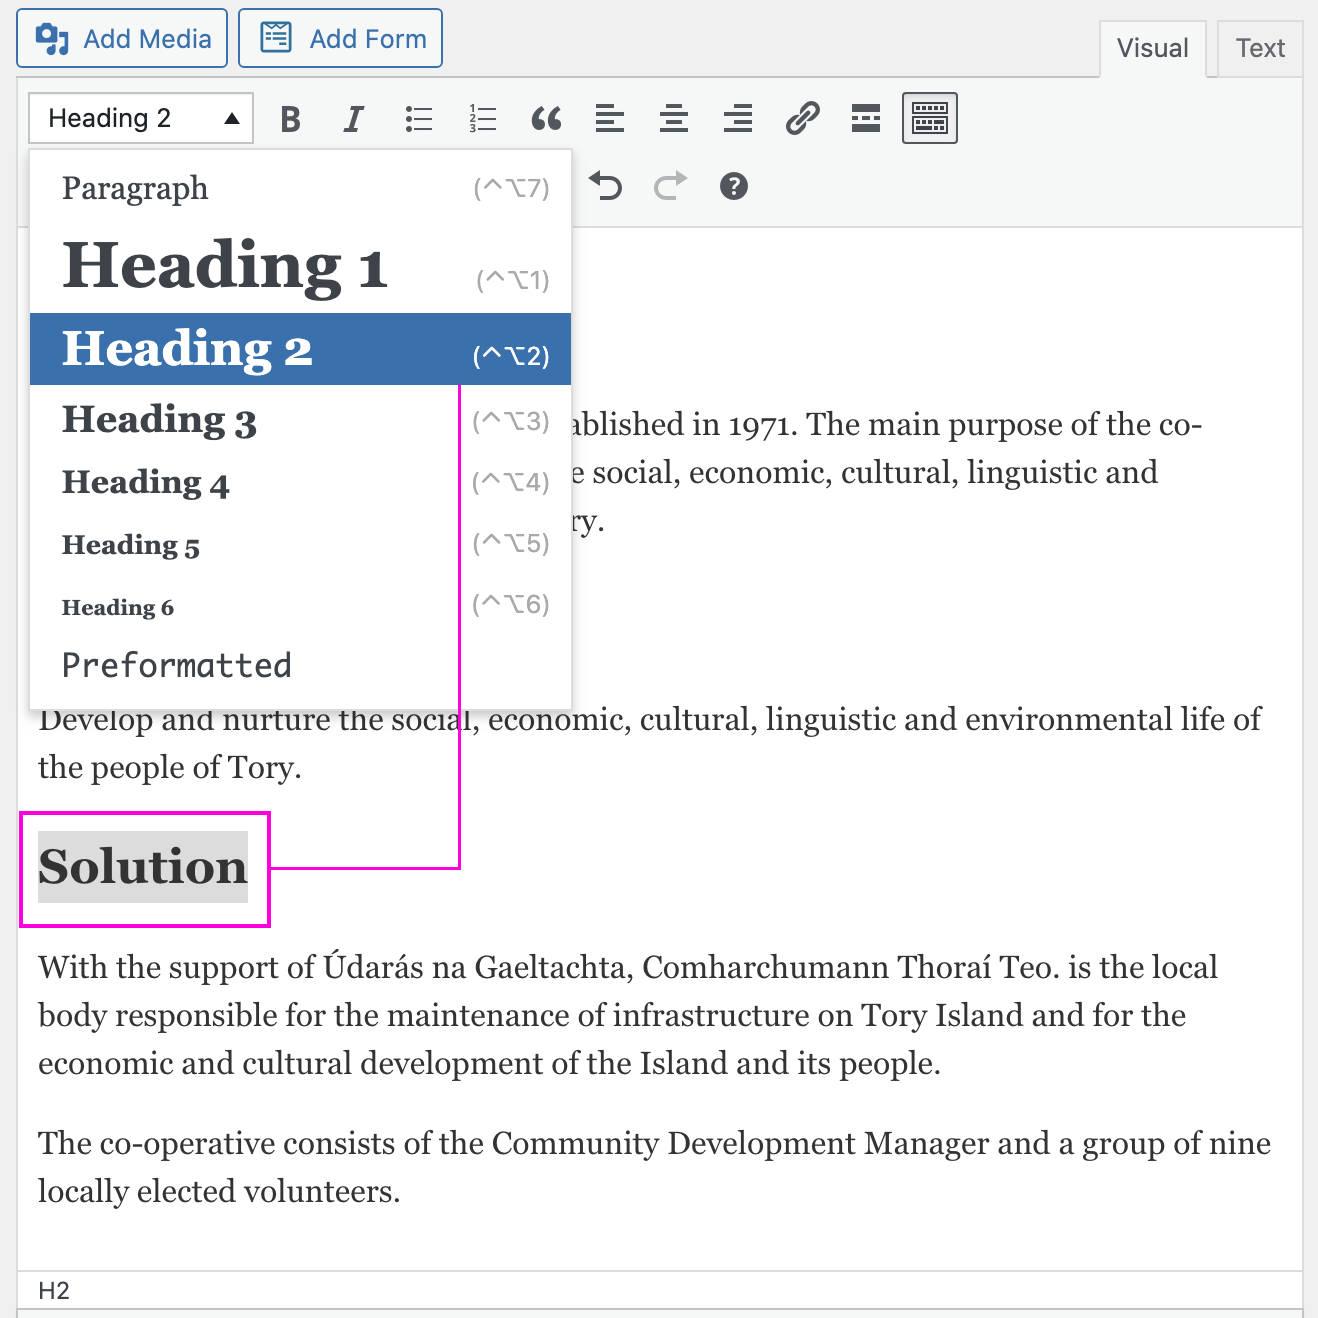
Tag headings in WordPress properly using the various heading tags. Typically you will begin at H2 as the Page Title will have been encoded as a Heading 1 by default.
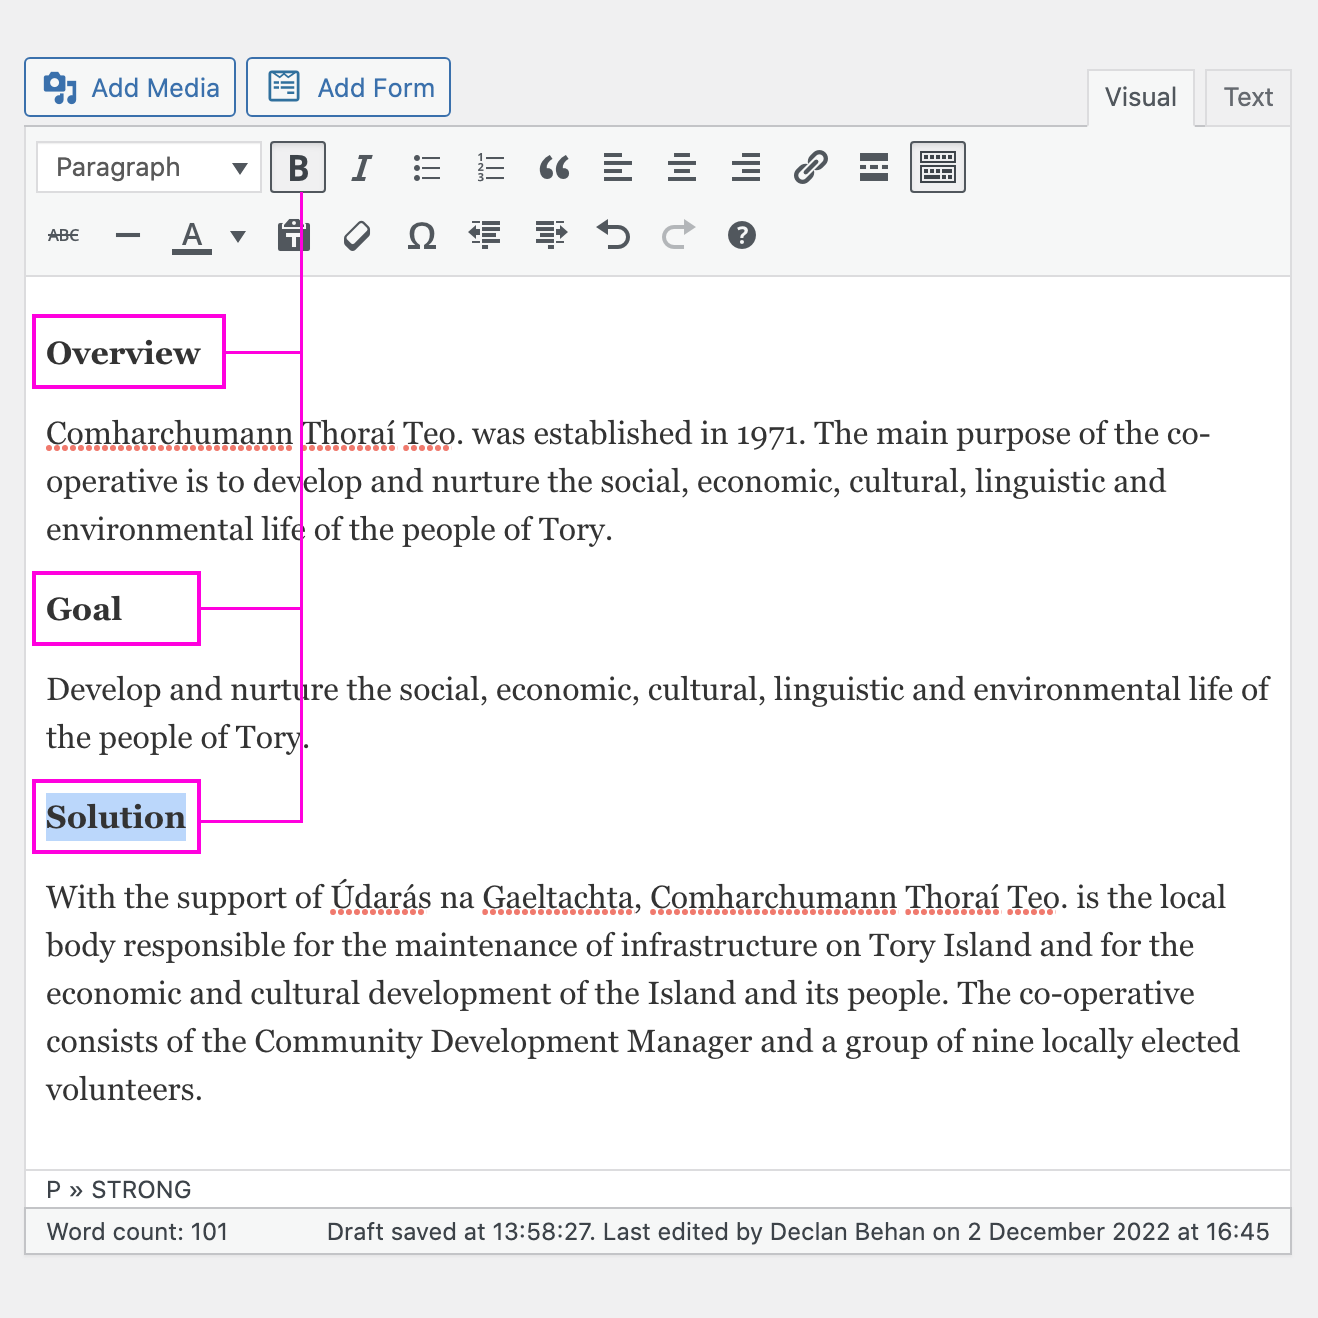
Don’t indicate a heading by just making normal paragraph text bold. Otherwise screen reader users will not be able to identify it.
You can use the browser tools below to display the heading structure of a page on your website.
Headings Map Chrome Extension
Sa11y Bookmarklet
Images
Image descriptions help users who are blind or have low-vision access the information contained in images. For every image, write alternative text that provides the information or function of the image. The appropriate text alternatives will vary based on the purpose of the image. You can use the Alt Text Decision Tree to help with how the alt attribute should be used.
The various types of image descriptions are outlined below:
Alt Text
Shortened from “alternative text,” this is a short visual description that provides a general sense of the content of an image. It is structured as a sentence fragment that indicates the most important content of the image.
Long Description
A long description sets out to provide more extensive and detailed visual information. Its purpose is to act at providing a closer look at an image. Long descriptions can be anywhere from a couple of sentences to multiple paragraphs. The complexity of the image will contribute to the length of the description. Long descriptions should comprehensively describe the most important content of the image augmented by details. Depending on your website and content long descriptions may not be necessary. For example a gallery or museum would require long descriptions of artworks, but a news post with a banner image probably wouldn’t.
Caption
A caption is visible to all users. It explains the image or illustration and sometimes includes crediting information, such as the photographer or copyright information. Usually this information appears below or next to the image.
Tips:
- Avoid text in images. You should only have images of text that are contained in a logo.
- Avoid using “image of…” screen readers already identify the content as an image.
- Aim to put the most important information at the beginning of the alt text.
How to write alt text
There are various methods to write alt text and they will vary based on context and organisation type.
Object Action Context Method
It doesn’t necessarily make sense to go from left to right describe everything in an image because that might lose the central message.
In this method the object is the main focus. The action describes what’s happening, usually what the object is doing. The context describes the surrounding environment.
This method is popular because it keeps the description objective, concise, and descriptive.
Be as descriptive as your audience needs. For content that is highly visual such as a heritage website or gallery, add more detail. If the content is focused on the non-visual content such as policy documents then keep it on the shorter side.
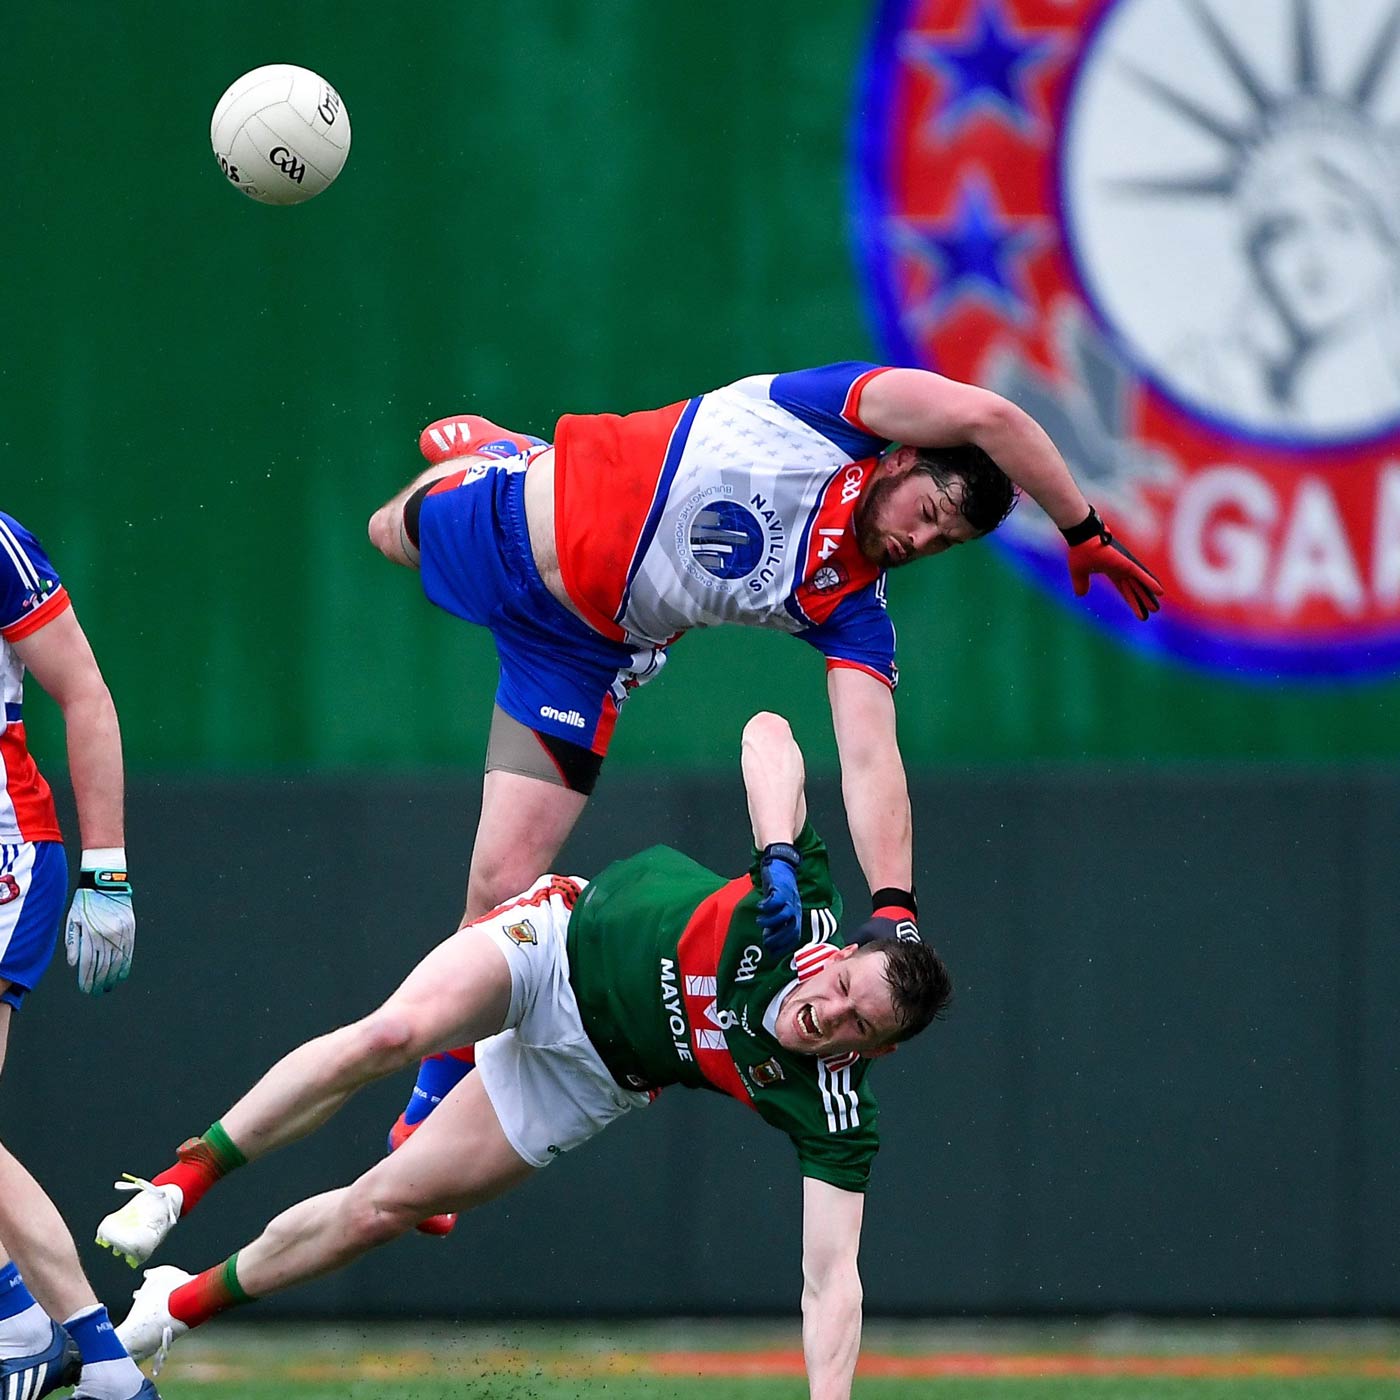
Example: New York forward Niall Madine clatters into Mayo defender Matthew Ruane during the Connacht Senior Championship match at Gaelic Park.
Object: New York forward Niall Madine
Action: clatters into Mayo defender Matthew Ruane
Context: during the Connacht Senior Championship match at Gaelic Park.
More about the Object Action Context Method
Image Descriptions Guidelines for the Cooper Hewitt Museum
WAI Image Description Tutorial
Videos
If there is video on the site, there needs to be a plan to make it accessible.
Video must be accessible to all users including those who have sensory disabilities (blindness, low vision, deafness, hard of hearing, deafblindness). There are different methods to ensure users with various disabilities have access to the information provided in videos. Common methods include:
- Captions: Text synchronised with the media for those who cannot hear the audible information.
- Transcripts: A full text document that includes spoken words, meaningful sound effects, and important visual information. People who cannot see or hear the content benefit from a transcript.
- Audio descriptions: An audio track added to the media where a narrator describes the important visual content that is not conveyed in the media’s original audio track (such as unspoken actions and events) for the benefit of people who cannot see what’s happening.
Prioritise videos that are on important pages on the site or will get the most views. If there is a video on the homepage start with that.
Sample workflow for accessible video
- Address accessibility in video content as the video is planned and produced.
(Usually by script writers, videographers, producers, and others) - Develop a described version of the video at the same time as the main video, if needed.
(Usually by the same people who produce the main video also produce the described version.) - Develop captions for the main video and for the described version.
(Usually if the video is professionally produced, the producers provide captions. Sometimes when informal videos are developed in-house, captions are outsourced.) - Develop a descriptive transcript using the text from the caption files.
(Often transcripts are developed in-house from caption files.) - Implement it in an accessible media player (usually an existing player with good accessibility support)
(Usually by web developers or website content editors.)
More detailed information about making video accessible
Audio
Your website may contain audio only content such as podcasts. If there is audio on the site there needs to be a text transcript for people who are deaf. This also benefits other users such as people who are in loud environments and can’t listen. A text transcript of the audio will also improve SEO and can be useful for people that want to reference your content.
Information about Creating Transcripts
How to create an accessible transcript for a podcast
- Start by listening to your podcast episode and transcribing the audio into a text document. You can use any transcription tool or service of your choice such as rev.com, amberscript or do it manually.
- Once the transcription is complete, review the transcript to make sure it’s accurate. AI transcription tools can sometimes have difficulty with Irish names, locations and companies. You can edit any mistakes by clicking on the text and making changes in the software editor.
- Make sure to format the transcript in a way that makes it easy to read and navigate. Use headings to break up sections, and add timestamps to indicate when different topics are discussed.
- Once you’re satisfied with the transcript, save it as a plain text file.
- Log in to your website and navigate to the page where you want to add the transcript.
- Copy and paste the text from the transcript file into the desired location for the transcript.
- Add any necessary formatting, such as properly tagged headings, links, paragraphs, and bullet points, to make the transcript easier to read.
Tips:
- Include speaker names: This can help readers understand who is speaking and follow the conversation more easily.
- Adding timestamps to your transcript can be very helpful for listeners who want to skip ahead to a specific topic. Timestamps can also be useful for search engines to index your transcript.
- Format your transcript for readability: Make sure your transcript is easy to read and navigate by using headings, bullet points, and paragraphs.
